Posts

Showing posts from 2020

Fun Christmas Scene Card
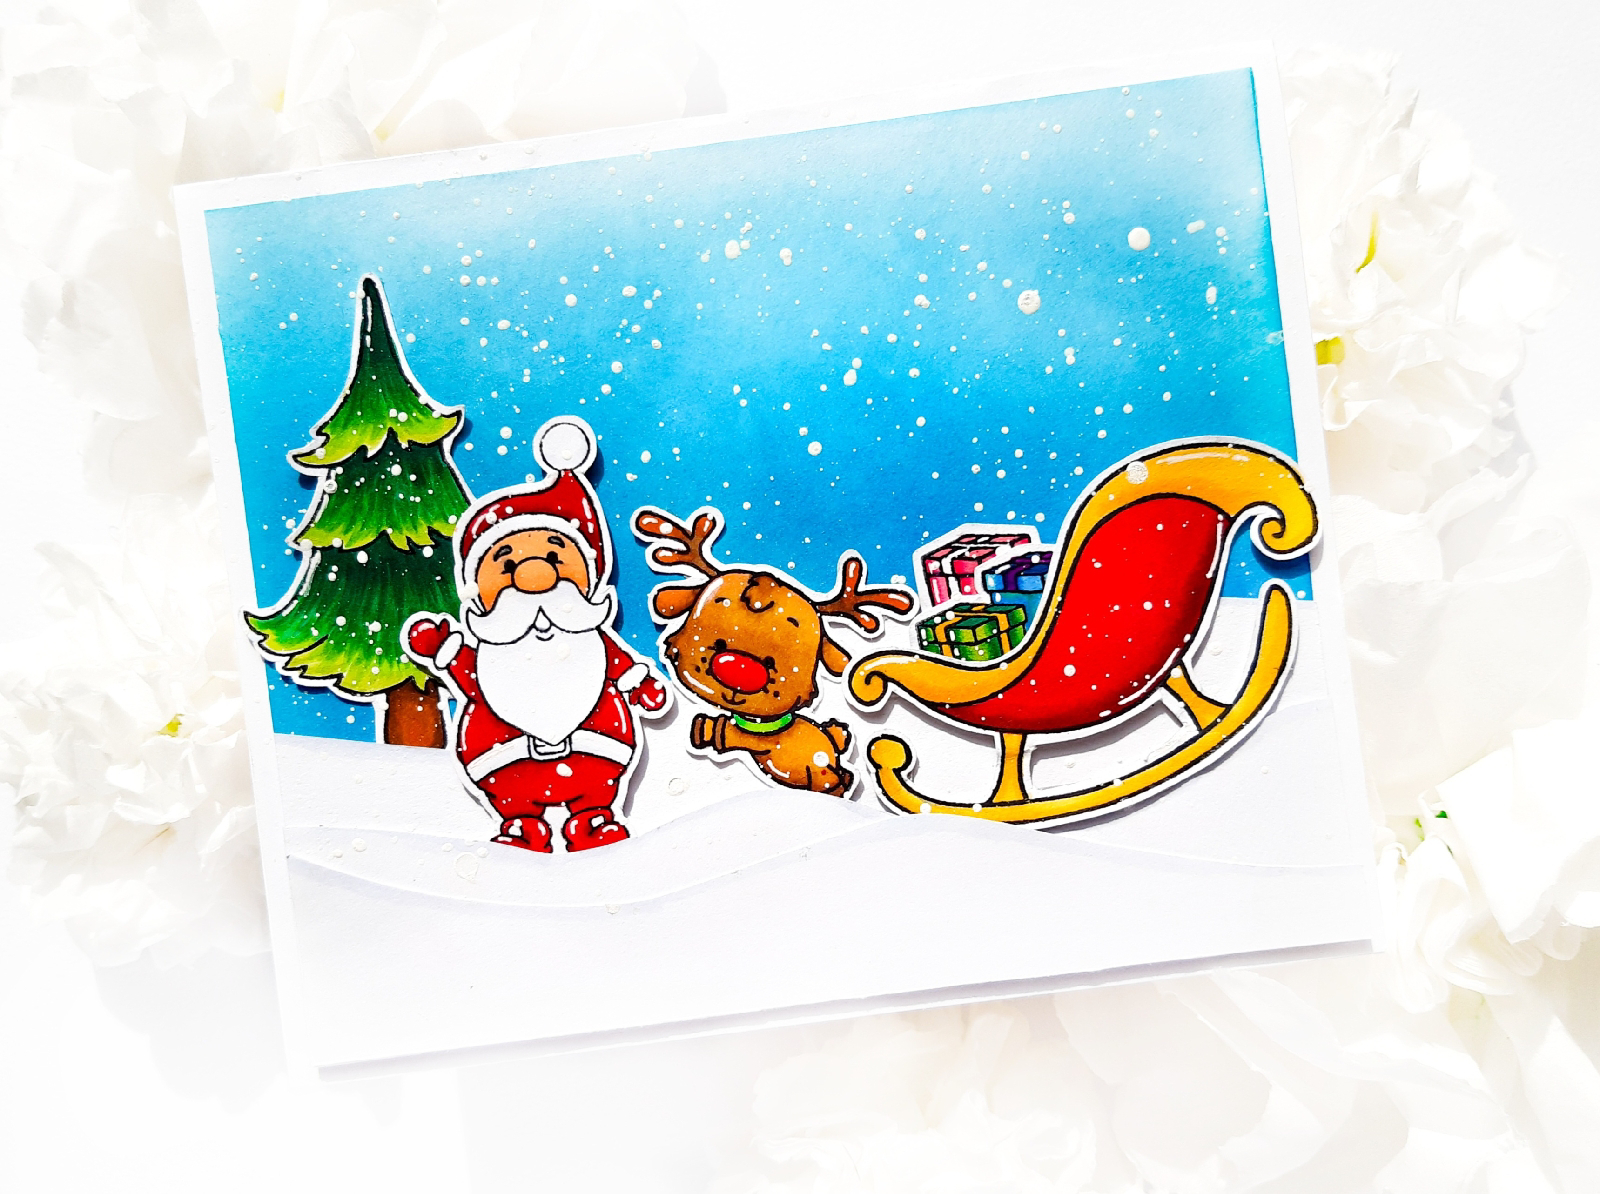
Image
Hello ๐Ÿ˜Š I hope you are having a lovely day! Here's the card we are making today. Today's card also features my first attempt at using alcohol markers ๐Ÿ˜‚. To start I stamped all images, colored them with alcohol markers and then fussy cut them. Next I worked on my background. I used two different shades of blue Archival ink and a blender brush to create my background. For the layers of the snow, I handcut three different layers of snow and then using a grey marker I went along the edges of the snow to make sure each layer could be seen clearly. I then adhered the layers over my background piece using foam adhesive. Finally I added all my stamped elements. To bring the whole card together I added some white paint splatter so that it looked like falling snow. That's it for today's card. Find me on  Instagram : @anishascraftstudio Have a lovely day! Cheers  Anisha๐Ÿ˜Š

Floral Christmas Card with a Twist

Image
Hello there ๐Ÿ˜Š I hope you are having a lovely day! This year has been such a whirlwind, many of us haven't got the opportunity to meet our loved ones, and sometimes all we can do is send an " I love you " and a card that feels like a warm hug. So this year for some o my Christmas cards, I used different sentiment stamps to make the cards more personal and closer to the heart.❤ For this card I started by stamping the Mudra Mogra stamp multiple times on watercolor paper and then added gold embossing powder and heat set it. I then watercolored my flowers using crimson red and viridian hue watercolors. I then adhered my watercolor piece onto green cardstock using foam adhesive. Finally I stamped my sentiment and then heat embossed. I added a green mat to the sentiment strip. To finish of the card I added white paint in the form of a splatter using a brush. That's it for today's card. I hope you liked it! Find me on  Instagram : @anishascraftstudio Taking p

Slimline Christmas Card

Image
Hello! I hope you are having a lovely day! In today's card I used a number of stamp sets to create Christmas themed cards. I didnt have any of my Christmas stamp sets as I was travelling so I had to improvise๐Ÿ˜‚ To start with today's card, I cut 3 square pieces of white cardstock and used a stencil brush and two different green inks to create the green background. Next I stamped my images on white and cardstock and colored them using watercolors and color pencils. After I cut my images, I adhered it into my green square pieces. Next I added a white mat to my green pieces, and then I used red cardstock to create a slimline cardbase and adhered my squares onto it using foam adhesive. To finish of the card I added some white paint using a brush and white paint. I hope you liked the card!๐Ÿ˜Š Have a wonderful day! Supplies Used  Mudra Magical Mushroom Stamp :  https://mudrastamps.in/product/magical-mushroom-craft-stamps/ Mudra Barn Red Cardstock :  https://mudrastamps.in/p

Quick Christmas Cards

Image
Hello ๐Ÿ˜‡ I hope you are having a lovely day! Today I'm sharing a fairly quick Christmas cards, perfect for when you are in a hurry. I love making these mini cards because they perfect to give along with gifts and also just to let the person know that they are dear to you! For this card I started by coloring my image. I used both watercolors and color pencils. Next I took a piece of red cardstock and used a star stencil and blender brush and applied Plum Archival Ink. I then added white stitched lines along the border. Next adhered this piece onto a patterned paper mat and finally onto my white cardbase. I then adhered my image onto the front panel using foam adhesive. Lastly I added a white paint splatter using a brush and diluted white paint. That's it for today's card! Find me on  Instagram : @anishascraftstudio Taking part in the  Craftangles Monthly Challenge  with this card. Have a wonderful day Cheers  Anisha๐Ÿ˜Š

Floral Christmas Card

Image
Hello ๐Ÿ˜Š I hope you are having a great day. I have to say that while making today's card, I rediscovered my love for Gold Embossing powder. Gold embossing powder is just so versatile and adds so much beauty to cards! I started with my floral border. I stamped the floral strip stamp onto watercolor cardstock so as to form a square. I then stamped the little girl and then sprinkled embossing powder and then heat embossed the front panel(watercolor cardstock). I then hand cut the panel around the floral border making sure to leave a little white border. I then watercolored the florals and the little girl. I was focussing on using mainly red and green while I was painting to enhance the Christmas theme, since the stamps I was using were not exactly designed for Christmas. Next I stamped my sentiment and heat embossed it. I then assembled my card. I used a white notecard and added a red mat to it. I then adhered the front panel and the sentiment strip using foam adhesive. To

Floral Wreath- Using Your Mini Stamp Sets

Image
Hello there ๐Ÿ˜Š I hope you are having a great day. Today's card features some gorgeous florals from a mini stamp set from Mudra Crafts. Here are some close ups  To start I drew a circle with a pencil on white cardstock. I then stamped the little floral cluster with a water soluble ink. Once I was done with all the stamping, I painted my wreath with watercolors. I then handcut the wreath making sure to leave a little white border around it, so that it stands out when I adhere it to the background. I chose a dark green cardstock for the base. I added foam tape to the back of my wreath image and then stuck it onto my base. I then splattered some white paint for some extra interest. I hand lettered my sentiment using a white gel pen. Finally I stuck the green cardstock onto a slightly bigger wine red piece of cardstock. That's it for today's card! I hope you liked it. Have a wonderful day๐Ÿ˜Š Cheers  Anisha

A Magical Wonderland ☺

Image
Hello๐Ÿ˜Š I hope you are having a great day! Today's card features some adorable stamps from Itsy Bitsy Stamps. To start with, I handcut a cloud stencil and used it along with blue archival ink and a stencil brush to create the background. I then cut two extra clouds to add some dimension. Next I stamped and colored my images from the stamp set. I used color pencils,watercolors and alcohol markers for the different images. With all my elements ready I started building my scene. I used foam tape to add some extra layers and the to create the visual effect of several layers. I doubled up the foam tape in places to make it pop up a bit more as you can see with the princess. That's it for today's card! I hope you liked it. Taking part in the  MFT Color Challenge 153  with this card. Have a supercalifragilisticexpialidocious day! Cheers  Anisha ๐Ÿ˜Š Find me on  Instagram  :  @anishascraftstudio

You Make Me Smile๐Ÿ˜Š

Image
Hello there ๐Ÿ˜Š I hope you are having a great day. So today's card is such a fun card. I realized I hadn't played with slimline cards in so long so it was about time!๐Ÿ˜‚ However this card was left in my card drawer for a few days and accidentally got slightly crushed ๐Ÿ˜ญ. But those sweet critters were too cute to not share so here it is! The most time consuming part of this card was definitely watercoloring each of those little critters, but the process was so much fun. Most of my cards feature foam tape because I love the extra dimension. To make the border of the card, I used patterned paper. I then used some orange and yellow dye inks along with my stencil brushes and just blended the inks on a piece of white cardstock. Finally I adhered my border and little critters into the card base using foam tape. That's it for the card. I hope you like the card๐Ÿ˜Š Supplies Used Craftyscrappers Circus Fun Stamp Set: http://craftyscrappers.in/index.php?route=product/product&

Flower Frame Card

Image
Hello there ๐Ÿ˜Š I hope you are having a great day. Today's card features some gorgeous florals from Mudra Crafts.  This is the Wild Roses Stamp Set.  For coloring my flowers I used watercolors.I kept the color theme pretty simple - Pink ,Green, Gold and White.  First I stamped the images using Versamark ink on white cardstock and then heat embossed it using clear embossing powder. You could alternatively use white embossing powder for a brighter white outline. After painting the embossed images from the stamp set, I hand cut each element. I stuck the images on a piece of white cardstock using foam tape. Next I used the Sakura Gold Gel pen to draw the vines connecting the flowers at the top and bottom. Finally I added some dots to add some extra interest to the card and adhered it onto a pink card base using double sided tape. Entering this card to the  Mudra Craft Challenge      Supplies Used  Mudra Wild Rose Stamp : https://mudrastamps.in/product

More Flowers!

Image
Hello there๐Ÿ˜Š I hope you are having a great day. Today's card features stamps from Mudra Craft.  For this card ,I did some repeat stamping of one of the floral images to create the background. I then painted the stamped images using watercolors. I tried to do some no- line watercoloring ,not sure if this qualifies as no line coloring,but I definitely enjoyed the process.๐Ÿ˜‚ I hand lettered the sentiment using a Sakura White Gel pen. That's it for today's card.  Hope you liked it ๐Ÿ˜Š Have a supercalifragilisticexpialidocious day๐Ÿ˜‰ Cheers  Anisha

Using Flowers as Your Focal Image

Image
Hello There ๐Ÿ˜Š I hope you are having a great day. Today's card features the Magnolia Stamp from Mudra Craft. Here are some close up images of the floral image. I used watercolors to paint my image. My color theme was the colors of the Indian Flag. Although it isn't very clearly visible, I stamped the corners of the blue background piece using the same stamp,but with white ink. I also added a splatter of white and silver paint,to add some extra sparkle. I didn't want the receiver of the card to be distracted by a very loud background ,which is why I kept it simple and ,almost tone on tone.  That's it for today's card. Submitting this card to the  Mudra Craft Challenge  and  The Flower Challenge . Supplies Used:  Mudra Magnolia Stamp Set https://mudrastamps.in/product/magnolia-craft-stamps/ Have a supercalifragilisticexpialidocious day! Cheers  Anisha ๐Ÿ˜Š Find me on  Instagram  :  @anishascraftstudio

Flower Fun!!

Image
Hello there๐Ÿค— I hope you are having a lovely day.Thank you for stopping by. Today's card features the Magnolia Stamp Set from Mudra. I think this stamp set is so versatile and can be used in so many different ways,which is why I really like it.  This card is pretty simple in the number of steps involved. First, I stamped the Magnolia stamp with white pigment ink on dark blue cardstock  Then,I colored the image using color pencils,with the theme of the 'Colors of India'. And lastly, I matted the blue piece onto white cardstock. And the card is done!!!๐Ÿ˜Š Submitting this to the  Mudra Craft Challenge  and  The Flower Challenge Supplies Used:  Mudra Magnolia Stamp Set https://mudrastamps.in/product/magnolia-craft-stamps/ Have a supercalifragilisticexpialidocious day! Cheers  Anisha ๐Ÿ˜Š Find me on  Instagram  :  @anishascraftstudio

Coloring on Colored Cardstock

Image
Hello There  I hope you are having a great day๐Ÿค— Today's cards feature coloring on colored cardstock. For my examples I used kraft cardstock. My first tip for coloring on colored cardstock is to make sure to use a white pencil to add highlights to make your colors pop.  My second tip would be to add layers of colors, this makes the colors more vibrant. My third tip is to add extra details, I added sparkle using a silver gel pen. My third and final tip would be ,if you want your colors to really be bright and not discolored by the non white cardstock ,first color the area with a layer of white. If you are really interested in coloring with pencils ,please don't be daunted by all the super expensive coloring supplies. You can do amazing work with what you have๐Ÿค— The color pencils I used are only $3 for a set of 36. Taking part in  The Flower Challenge Hope you have day filled with grace. Cheers Anisha๐Ÿ˜Š

Easy Interactive Card

Image
Who doesn't love interactive cards!๐Ÿ˜„ Today's card was so much fun to make and not too difficult either. The circle spins to reveal a blue colored sky. The whole card is held together by a BRAD! Yes ,you heard it right. Brads are such fun supplies to work with ,since they offer endless possibilities,especially with interactive cards. Both stamped images are from the Princesses and Dragons stamp set from Itsy Bitsy. I colored the image using watercolors. For the background I hand cut the cloud stencil and used Ranger Archival Inks and a blender brush(yet another amazing tool).๐Ÿ˜‰ I hand cut the grass(a very tedious process๐Ÿ˜‚) and adhered to the card to complete the scene. I added some EXTRA detail in the form if stars and faux stitched lines using a silver gel pen.  Finally I stamped the sentiment and we are done!! Yay! The supplies I used: Ranger Archival Inks :  https://rangerink.com/collections/archival-ink Stamp - Princesses and Dragons :  https://itsy

Using Scraps to Create Awesome Backgrounds!

Image
Hello There ๐Ÿ˜Š I hope you are having a great day and thank you for stopping by.๐Ÿ˜‰ So this is the card for today. I think is card is so fun,don't you? So for the background I used some old scraps of paper I had, and cut them in varying thickness. Varying the thickness adds some extra interest. I just stuck all my strips on a piece of white cardstock diagonally,keeping a order for the colors in mind,if you want you could do a completely random pattern. I did the same for the circle on which my stamped image is matted. I didn't want the colors of the card to be too overwhelming so I added a piece of vellum onto the background piece. I stamped and heat embossed the sentiment on black cardstock using silver embossing powder and Versamark ink. Using a silver gel pen I added dots and stitched lines around the card and the piece of vellum. And that's it for today's card. I hope you liked the card as much as I did. The Stamp I Used : Craftyscrappers Circus Fun Stamp

Flower Power

Image
Hello there๐Ÿ˜Š I hope you're having a great day. Today's card features some handmade flowers that I made using Tim Holtz Tattered Florals die. This die was a gift from my uncle and I absolutely love it because ,it has many different flowers ,in different sizes ,as well as a set of leaves. Each rose requires about six diecut flowers. I used paper painted with coffee for my roses to add that rustic look. To add some color I used two different shades of green for the leaves and faux stitched lines using a silver gel pen. For the background I used kraft cardstock and added silver dots for some extra interest. To finish the card I matted it onto some dark brown cardstock and added more stitched lines along the border.  Tim Hotz Tattered Florals Strip Die: https://www.amazon.com/Sizzix-657824-Sizzlits-Decorative-Multicolor/dp/B0075SGACM That's it for today's card,I hope you liked it. Cheers  Anisha๐Ÿ˜Š

Critter Party+ Slimline Card๐Ÿ˜‡

Image
Who doesn't love critter stamps, if I were to choose one set of stamps to make all my cards ,I would choose either critters or flowers๐Ÿ˜‚ Today's card is actually very simple and very cute and in trend๐Ÿ˜Ž - slimline cards!!! On the side you can see the stamp set I've used, so cute๐Ÿคฉ. So all I did was used my nested stitched circle die and cut 3 circles from white cardstock and 3 circles from dark blue cardstock ,one size bigger than the white circles,and then I matted the white circles on the dark blue ones. Then I stamped my images,colored them,and finally adhered them onto light blue cardstock. I added silver stitched lines to the circles and around the edges of the card.I added some splatters of silver paint onthe light blue cardstock before I adhered the circle elements. And that's it for todays card,I hope you liked it.๐Ÿ˜Š Craftyscrappers Circus Fun Stamp Set: http://craftyscrappers.in/index.php?route=product/product&product_id=1588 Cheers  Anisha๐Ÿ˜‰

Same Stamp Many Cards

Image
Hello there ๐Ÿ˜Š I hope you're having a good day  So today I wanted to share some inspiration so you could how one stamp with different techniques can give different cards.  The Stamp I used : Craftyscrappers Love Struck Stamp: http://craftyscrappers.in/index.php?route=product/product&product_id=1582 Cheers  Anisha๐Ÿ˜‰

Birthday Cards

Image
Hello There ๐Ÿ˜‰ Hope you are having a good day  So today I wanted to showcase some cards using the same stamp. Using the same stamp but different color combos and different techniques, like coloring on dark cardstock as seen in the first picture,you can create a lovely set of cards.๐Ÿ˜‰ Supplies  Craftyscrappers Floral Words Stamp Set: http://craftyscrappers.in/index.php?route=product/product&product_id=1582 Cheers Anisha๐Ÿ˜Š

Pull Tab Slider Card

Image
Hello There ๐Ÿ˜Š I hope you are having a supercalifragilisticexpialidocious day๐Ÿ˜‚ So today's card is a slider card and I had so much fun making it. And here's how the card looks when you pull it. This card did take quite a long time but im so happy with how it turned out ๐Ÿ˜Š Supplies Craftyscrappers Love Struck Stamp Set: http://craftyscrappers.in/index.php?route=product/product&product_id=1576 Floral Words Stamp Set(used for stamping the roses on the dark pink cardstock): http://craftyscrappers.in/index.php?route=product/product&product_id=1582 Cheers Anisha

Repeated Stamping For Creating Backgrounds

Image
Hello There☺ I hope you're having a great day. So in today's card I'm using a smaller stamp to create a full background for my card. The stamp is the love struck stamp set from craftyscrappers.  All I did was stamp it repeated in a diagonal pattern with VersaMark Ink and then used black embossing powder and heat set it. I then colored the critters using watercolor markers. Finally I colored in the background (which was initially  white)with a dark blue marker. I then mounted it on a lighter blue cardstock and added hearts and stitched lines using a silver gel pen. Supplies Craftyscrappers Premium White Cardstock: http://craftyscrappers.in/index.php?route=product/product&path=86_88&product_id=1108 Love Struck Stamp:  http://craftyscrappers.in/index.php?route=product/product&product_id=1576 Hope you enjoyed today's card ๐Ÿ˜‰.

Dancing In The Clouds-Easel Card

Image
Hello There๐Ÿ˜Š I hope you're having a good day. Today's card is an Easel Card and has a lot of stenciling using a DIY stencil. So for the stencil all I did was cut up simple cloud shape making sure each "bump" of the cloud was of different sizes. This adds more texture and interest to the card .  The stamps I used are from Itsy Bitsy. I used the Easel Card Die from Sizzix for the card base. Cheers Anisha