Posts

Showing posts from July, 2019

Hedgehogs:)

Image
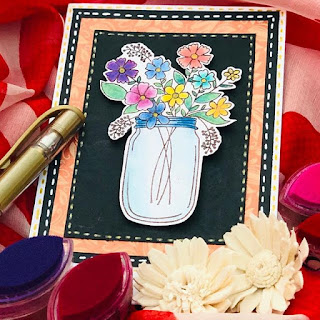
Hedgehog Love Don't you think hedgehogs are just adorable ;) I first die cut all the elements required for the card. I then created a distress ink background using the colours- picked raspberry and dusty concord. I then spritzed it with water which contained perfect pearls pigment powder , I then also spritzed the die cuts. Then I stamped and coloured my hedgehog and then fussy cut it. I matted the distress ink background onto a piece of black cardstock and then again on white. I then added white stitched lines with my gel pen as well as white dots to add further interest. And that is the card for today. Supplies Used Distress Ink-Dusty Concord and Picked Rasberry Stamp- Itsy Bitsy Looking Sharp Spellbinders Die D-Lites Medallion 2 and Bird Scrolls Have A Great Day!!! Cheers Anisha :)

Roses are red Violets are blue.......

Image
Some More Roses!!! Who doesn't love roses ;) I first took a piece of brown cardstock, cut it in the shape of a pot and using my white gel pen I added dashed lines as well as a small design at the top of the pot to add interest. I then stamped and fussy cut the roses . The stamp used is Mudra Botanical Blooms stamp set which is a layering stamp set. I used the the ColorBox Cats Eye Queue ink pads as these provide the perfect shade of colours for stamp layering. These are pigment inks. I then took a piece of black cardstock, stuck the pot and the flowers onto it and then I stuck it on a slightly larger red card base. I felt the black looked a little plain so I added white dots of different sizes with the white gel pen. To add a little more colour I used a cotton swab to add ink to the small dots as these allowed a little more control, and there you have todays card. SUPPLIES USED Colorbox Cats Eye Ink Pad Queue- https://www.amazon.co.uk/Clearsnap-ColorBox-Pigment-

Purple Madness

Image
The Purple Card Purple is often associated with royalty, nobility, luxury, power, and ambition. So lets make a card to celebrate the colour purple. I first started with a white A5 card base. I cut a smaller piece of purple cardstock, so there was atleast a quarter inch border of the white cardstock around it. I then used Anna Griffin Flower Bramble Die and die cut white cardstock. From another piece of white cardstock I die cut the frame using Spellbinders Die D-Lites Medallion Two Die.I then adhered the flower bramble die cut to the purple piece of cardstock and on top of that I attached the medallion die cut. I then die cut flowers using Tim Holtz Tattered Florals Strip Die and stuck it on the card. I then used the Versafine Imperial Purple Ink Pad and lightly applied ink on the card front, and that's the card for today. SUPPLIES USED: Anna Griffin Flower Bramble Die- https://www.amazon.co.uk/Cuttlebug-Griffin-Flower-Bramble-Provo-Craft/dp/B01AS7G95O Spe

Flower Bouquet :)

Image
Sending Flowers Flowers are a great way to let people know you care, but how about sending them flowers that will never wilt ;) I started by first stamping my image onto a piece of white bristol cardstock. I then coloured the the flowers and the jar using colour pencils and metallic watercolours. Then I fussy-cut the image and adhered it onto a piece of black cardstock with foam tape, which I further matted on a piece of patterned paper, to which I added another layer of black cardstock followed by white. Yes, these are a lot of layers but they do add a certain beauty to the card. Lastly I added the final touches to the card with dashed lines with a white and gold gel pen. SUPPLIES USED Stamp- https://itsybitsy.in/collections/clear-stamps/products/clear-stamps-flowerful-gratitude-3x4inch-3pcs White Gel Pen- https://uniball.in/shop/index.php?id_product=173&controller=product Gold Gel Pen- https://uniball.in/shop/index.php?id_product=159&controller=product R

Waterfall Card

Image
Into The Jungle We Go Waterfall Cards are a great way to add some extra excitement to your card. I first created the background by using a stencil and Versafine- Deep Lagoon ink. Then I stamped the images of the animals on white cardstock and layered it on a piece of black cardstock. I then rounded the edges. For the waterfall mechanism take a piece of cardstock that measures 10x2 inches. Fold this piece in half  and make score marks from the folded edge in a series of half inches four times. Now adhere the animal images that we prepared onto each division . To make the mechanism work adhere the mechanism part to a piece of black cardstock and stick it to the stenciled background ensuring that only the edges of the black piece are stuck. I then added the final details, by adding the dashed lines with a white gel pen and also used a scalloped punch to punch the pull handle of the mechanism. SUPPLIES USED Stamp- https://itsybitsy.in/collections/clear-stamps/products/c

Celebrate with the Animals

Image
Celebrate with the Animals!! I first stamped the images of the animals on white cardstock using hand cut masks.Then I coloured the images using coloured pencils.I filled in the empty white spaces with a black marker for a better finishing. I then layered it onto a piece of brown cardstock and added another layer of black cardstock. Using a white gel pen I added dashed lines as well as dots in the background. I then took a 1 inch tall piece of brown cardstock and matted it with a piece of black cardstock. I the stamped the sentiment "CELEBRATE" and adhered the sentiment piece to the card front. SUPPLIES USED Stamps- https://itsybitsy.in/collections/clear-stamps/products/clear-stamps-jungle-birthday White Gel Pen- https://uniball.in/shop/index.php?id_product=173&controller=product Rest are supplies from my stash. Have A Great Day! Cheers Anisha